
Robin
Step by Step Stage 2
Adding the red chest and wing, plus a branch to sit on
Okay I will admit that the eye was the easy bit but for some of you far too easy and possibly a little bit boring! So now we are going to have some originality and excitement about adding colour to the robin.
Before you have a heart attack or imagine the next stage is really difficult, read what I am about to say!
Before you touch the paper with your next brushstroke I want you to close your eyes and imagine you are looking at a real robin. On a cold winter day. The feathers could be fluffed up against the cold and if you notice that chest isn't really red in colour is it? It is more of an orange. But for some reason as a child I always called them robin redbreasts!
Anyway lets move on and add more colour now.

Working away from a starting point!
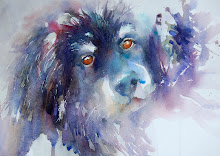
Painting the red section. The eye was your starting point . Now slowly work around the eye with Alizarin Crimson and drop a touch of cadmium Orange into the new wet section to allow the pigments to merge and give you a softer red/ornage appearance. Work VERY slowly at first around the eye then bring this soft red colour downwards to form the chest section.
TIP: Keep the colour very soft as the subject is soft and could fly away.
Painting the head and wing. Now use a soft brown shade and add a hint of colour the top of the head . Next, hint at one wing too in the same colour.
If you bleed the edegs with a damp burhs loaded with clean water you will get a beautiful looseness that creates a feeling of movement and life in your results.
I have added a touch of cerulean blue at the under belly area
Using a deeper shade of the same brown I added a twig for my robin to sit on. I allowed colour to run from the body to the twig to form one leg!
Use your imagination on where to place your twig or branch so that your painting is original!
This is supposed to be fun so please smile while you are painting!


5 comments:
Wonderful idea Jean!! I am guessing that you paint more with your paper tilted rather than flat on the table? The American Robin is a different bird than your UK version so I may vary the palette a wee bit. Hopefully the technique will work as well for me as it does for you!! And since I am an amateur artist, I will donate the finished product to my local cancer care resource center (they help cancer patients with free wigs, hats, books, support groups and most of all love and care).
Hiya! I realise the birds will vary in each country so any bird that suits you is ideal for this project and fund raising idea! I love that you will donate to your cancer care centre. Thank you so much and please can I see your robin when it is finished?
Hallo Jean. Ich bewundere Deine Arbeiten und die Idee hier ist grossartig. Ich möchte auch ein Bild unter Deiner Anleitung zu malen. Es macht mir grosse Freude dein Malstil zu lernen und es zu verstehen. Vielen Dank für die Möglichkeit.
grüsse aus Deutschland.
PS. Ich hoffe Du kannst ein wenig verstehen was ich hier geschrieben habe. ich selbst spreche kaum englisch und nutze den Google-Übersetzer.
What a wonderful idea Jean - I've already been painting robin Christmas cards for friends and family for Christmas but have also offered them for sale on my facebook page - if I do sell any I think it's a wonderful idea to donate the proceeds to cancer, you're an inspiration!
Hi Jean, mein Bild ist fertig und ich habe meine künstlerische Freiheit genossen und doch Deine Anleitung verfolgt.
Hier ist ein Link zu meinem Werk, wenn Du sehen magst
http://fillesansnom.blogspot.de/
Post a Comment